Showing posts with label novice mechanic. Show all posts

Friday, 15 January 2016

UGU is fixed and the Doctor was me!

Gosh, it has been a while since I have sat down to write a blog, but today I made the special effort to celebrate my experience.

Last week I went to take UGU for her first run of 2016, but on starting her I knew immediately something wasn't right.  Parked in an underground garage she limped to the garage door but didn't have the power to pull up the driveway and was running so rough that anyone would have thought she was a diesel.


UGU sounding very sick

Unsure what to do I called my mechanic, who unfortunately was still on Christmas holidays.  I then turned to my Facebook group W(A)114/115, and posted a video of UGU's state of ill health.  It was here that I got my course of action.

UGU still looking pretty even with her bonnet up :)

It was suggested that UGU was running with at least one cylinder not firing, and that by systematically disconnecting the spark plug leads one at a time, any lead removed that did not cause the engine to run differently was at fault.

As it turned out both cylinders 2 & 4 were not firing! (No difference made to the engine running)

With my little helper and original Mercedes-Benz spark plug tool I carefully removed these two spark plugs and replaced them with new ones.
Daddy's little helper

Original Mercedes-Benz tools

Whilst doing this I was terrified of a similar result to that of my W116, where one of the spark plugs had been installed incorrectly stripping the threads, ending up with a halo coil being inserted.

Thankfully UGU's spark plugs came out easily, and the new ones went in without any problems. I crossed my fingers and turned the key, yeeha! She's alive and well.

The spark plugs that were removed were absolutely black, I am not sure if this is because she hasn't been on any decent runs in a long time, but for the minute the new ones are in, UGU is running and I am happy.

YUK! Source of the problem
New spark plugs ready for insertion with "neck collar thingy" removed

I proceeded to replace the remaining four spark plugs with a grin on my face and with them all replaced, I washed up and took UGU for a drive, finally her first run of 2016!!!

UGU on her first run for 2016 to Perth's iconic Kings Park

Whilst out on my cruise with UGU my efforts were rewarded as I was driving along Bagot Road in Subiaco, I just had to pull over, I couldn't believe my eyes!! Sitting parked at the side of the road, hiding from the sun under the shade of a tree, was a brand new Land Rover Defender 90, limited edition "Heritage"!

 Land Rover Defender, Special Edition Heritage, WANT ONE!

Now in business I am often referred to as a "details man", therefore it would not surprise many as to how much I love this Landy!

The Heritage Defender references the 1948 design features of the first Land Rover Series 1, affectionally know around the world as "Huey", his number plate was HUE 166.  You will see this number on the badges on the wings and as embellishments on the seats, the wire mesh style grille replaces the previous plastic version, door hinges are painted silver to acknowledge the original galvanised ones and the "Land Rover" badges on the grille and mudflaps have all been reverted back to the way they used to be.

 A nod to "Huey"

Original branding badges make a welcome return.  

Also check out the company on the wheel cover Milvill and Moon, they have some beautiful stuff, hand made in Africa

With the Defenders days now numbered and buyers going crazy to snap up the last models, the Heritage will be a future classic I have no doubt, perhaps it already is a classic?! In the future, when all the planets align, the clouds are the right shape, and a pig flies gracefully through the air,  I hope to have one to park alongside UGU and Leif.

Find out more about the Limited edition Land Rover Heritage: Land Rover Defender, special edition Heritage

Sunday, 8 February 2015

First things first, we need to stop!

With Leif off the tow truck and home for a few weeks, I hadn't done much more than look at her and think about what I was going to do, or at least try to do.

Leif is a long term project and, to be honest, I am in no rush to get her back on the road.  If I want to go for a drive, or hang out with some fellow enthusiasts and car club members I will take my beloved UGU. I will admit that this luxury of choice makes me feel not only very spoilt, but very thankful for my understanding wife.

I have no illusions that Leif will be some amazingly comfy and thrilling vehicle to drive, or that she will be some sort of show vehicle or extreme off-roader; this project for me is all about the process, with no timeframe and no predetermined outcome.

From the moment Leif arrived on the back of the tow truck I knew there was an issue with her brakes, as the brake pedal would go all the way to the floor with no resistance and no stopping power at all, highlighting the first job I needed to attend to.

Brake pedal goes all the way to the floor with no resistance
(Check out those safety boots haha!)

Having moved Leif from the front to the back of the Tyro Workshop I had worked out that if you pumped the brake pedal in rapid succession, after the seventh or eighth pump there was enough brake pressure to stop from a slow roll.  This, combined with the knowledge that the previous owner had recently replaced the master cylinder made me believe that there was air in the system.

I reached for my repair manual and went on-line to see how to fix the problem.

The process of bleeding the brakes is really very simple even if you are doing it on your own as I was.  (If you have a friend close by that you can ask to pump the brake pedal as you lie under the vehicle and do the messy bit, it would be even easier), however doing this on my own I did some research and bought a vacuum pump off Ebay.

New tools.  Vacuum pump and new brake/clutch fluid

I located and examined all Leif's bleed nipples. Over the next two days whilst I waited for the vacuum pump to arrive I gave them a good soaking with penetrating oil to try and free them up as they were seized solid.  This duration seemed to be the perfect amount of time for the oil to do its work, and by the time I had figured out how to use my new tool the bolts were nice and free.

To get started I removed the lid from the fluid reservoir and filled it to the brim with new brake/clutch fluid.  This would later allow me to see if the level had dropped.

I will admit there were various opinions about the order in which to bleed the brakes, but I followed the brake lines to the back end and connected the vacuum pump to the passenger side wheel after deciding it was the one furthest from the master cylinder.

I squeezed the pump to get pressure into the tube and watched the gauge to make sure there were no leeks before opening the bleed nipple.  If you can't get a airtight seal I did read that grease could be used around the end of the tube to seal it to the bleed nipple, but I didn't need to do that.

Vacuum pump tube connected to a well soaked bleed nipple

With the bleed nipple open I filled the pumps reservoir in accordance with the product instructions, and locked off the nipple before disconnecting the pump having seen no bubbles escape into the fluid.  I moved onto the other rear wheel, then passenger front before finishing on the front driver's side.  Between each wheel bleed I returned to the reservoir and topped up the fluid making sure that no air could re-enter the system.  I also checked the brake pedal to see if there was any resistance; to my delight there was now a bit.

I had seen a few bubbles come out during the process but it was not until I got to the front driver's side when I witnessed a lot of bubbles escaping into the vacuum pumps reservoir.

Vacuum pump doing its thing on the front driver's side

Bubbles in the system

With the brakes bled and the reservoir full again, I was so pleased to have a nice firm brake pedal.  I jumped behind the wheel and slowly drove around the block checking that everything was working and, to my relief, it was.

It is pretty nerve racking driving a vehicle for the first time, knowing that the only way of stopping it is via something you have just done, also for the first time.  With that said, the feeling of exhiliration when it all works as it should is very, very satisfying!

Lets hope this sets the tone as I continue on this restoration journey.


Monday, 12 January 2015

Knowing your car - Land Rover

At the time of writing this post, I have owned Leif for a little over two weeks and, as with UGU, I am keen to find out as much information as I can about her.  There is lots of information out there but it is not as easy to find as with Mercedes-Benz, so I am piecing the bits together as I collect them from both on-line sources and from local and interstate fellow enthusiasts.

So, here is what I know so far.

Leif is a 1969 Series 2A, 109" (long wheelbase) Station Wagon. I am the lucky fourth owner;  her namesake who I bought her from, bought her from his friend, who had bought it from his dad, who bought her new.

Leif & Leif at Farr's Transport Yard before her trip to Perth

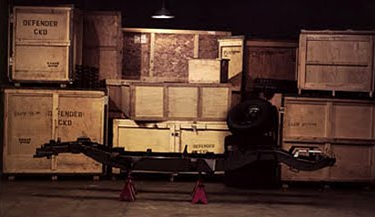
Leif is what is known as a "CKD Kit" which stands for "completely knocked down".  This means that all of her components were produced and painted in the Land Rover factory, Solihull, England and shipped to Australia in pieces, ready to be assembled by a local agent.

This was done in countries all over the world and is still a common practise in the automotive industry today. According to website http://www.range-rover-classic.com, Land Rovers and Range Rovers were being built in "23 countries abroad of UK in 1980".

Land Rover Assembly locations, 1980

 1972, African Land Rover CKD Assembly
Image via "range-rover-classic.com"

2003, Land Rover CKD Assembly
Image via "range-rover-classic.com"


Despite this being a common practise it was news to me, and the only thing that raised a query with me was the plaque attached to the firewall showing that she was produced by the "Pressed Metal Corp Ltd."


Leif may have been conceived in England but she is true blue Aussie

If this plate was not evidence enough, Leif's chassis number is also a vital source of information. The first three digits "352" refer to her origins as "Export, RHStg, 109 Station Wagon", and by the rest of the numbers I assume she was the 128th built.

(Chassis number Information from the Land Rover Series 11 & 11A Repair Operation Manual AKM8159, generously gifted to me by my family in the UK)

Leif's Identification plate found on the firewall

Present from my family, and hopefully instrumental to Leif's restoration.
Also check out Leif's outdoor water tap connected to a large tank in the back!  I am yet to decide if I wish to keep it or not.

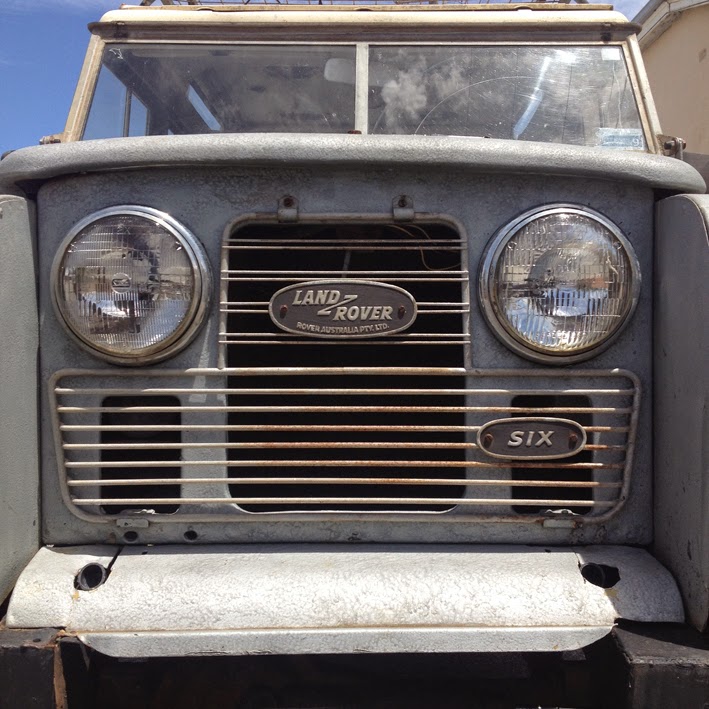
I found all this information very exciting, but it didn't stop there, one detail I had spotted in Leif's photographs before I bought her was the badge on the grille with the word "six".  I had never seen this before, nor the particular grille that she sports.

Starting with the badge.

More forward power needs more stopping power

I had no idea that Land Rovers were even available in anything other than a four cylinder 2 1/4 petrol, or diesel engine, but they were also available as a 2.6litre, six cylinder!  So that little badge corresponds with the chassis number "352" confirming she is a 2.6 litre six.

This increased power brought with it some additional stopping power, so Leif has larger brake drums than the 4 cylinder variants and also has a servo assisted braking system.

Unfortunately Leif's original motor has long since been removed and she now sports a 3.3 litre Holden blue straight six.  I am a bit disappointed about this, but do have to appreciate that in a country as big as Australia, the best motor, is the most available motor.  On the plus side I am lead to believe that this particular motor is very simple to work with and the previous owner also informs me that the original gearbox has been replaced with that from a series three so she has a synchromesh.  

I know the purists out there will be disgusted by this bastardisation, but for me, I don't really care, it is all part of Leif's history so the motor will stay.


The Holden Blue Motor was available from 1980 - 1985 in both a 3.3 & 2.85 Variants eventually superseded by the black motor. The block casting confirms this is a 3.3 Litre 


Back to that grille...the information I have on it, from a fellow enthusiast in Australia's Northern Territory is that it is a rare grille only produced for Australian Built station wagons.

The more common Series 2A Grille
Having looked at many photos recently, I am not sure if Leif has the correct bonnet.  It might be a series 3 bonnet, noting the thickness to the edge rather than the flat type seen in this picture. Image via homer-simpson on Flicker

It is incredible how one photo has so much information; above we have discussed the "six badge" and the grille, but there is still one more subtle difference between this Australian CKD and a UK imported vehicle, the Land Rover badge itself.

If you look closely you will see that the sub heading says "Rover Australia Pty Ltd", a UK built vehicle wouldn't have this.

Leif's Aussie badge

UK model, Grille badge

So there you have it, only two weeks in and I have learnt a little more about my new acquisition. I am really excited to see what else I will discover through my journey to get Leif registered and back on the road.

Leif waiting to get out of my back yard and on or off road again


Sunday, 23 November 2014

A tough nut to crack

When removing the interior from Jade, the steering wheel extraction has to be considered as one of the easiest jobs, however the boss removal; that is a whole other story!

Those of you who have been following my blog will know by now that Jade is a Series 1 W114, which means she has the much more delicate and in my opinion elegant steering wheel, complete with a chrome ring which in earlier Benzes, such as the Ponton, is actually the indicator switch.

As part of the series 2 face lift, this steering wheel was changed and brought into line with that of the bigger W116.  That wheel is much chunkier and lacks the classic aesthetic of the previous version, and so it is common to see the owners of series 2 cars sourcing the earlier version to install on their cars.

Jade's Series 1 Steering Wheel

Later Series 2 Steering Wheel, also seen on the W116, R107, W123

To remove the steering wheel all you need to do is use a large flat head screwdriver to prise the horn pad off.  It will easily pop off but be careful not to damage the pad.

With the horn pad removed you will see 5 nuts that hold the wheel to the boss; undoing those nuts will allow the wheel to be separated from the boss.

Steering wheel boss with the steering wheel removed.  Note the large central nut securing the boss to the steering column, and also the uneven spacing of the steering wheel fixings

It is worth noting as you remove the wheel from boss that the bolts are not equally spaced, which means the steering wheel can only be fitted in one location, pretty smart really, but frustrating if you do not notice the uneven spacing.

For the boss removal, you will need to keep the steering wheel fitted as you will need it for leverage and for goodness sakes make sure the steering lock is not on, as you will damage it if it is engaged.

There is a single nut that secures the boss to the steering column (refer to picture above), and as you would expect it is on good and tight.  I used my ratchet and all the extension bars and strength I could muster but it wouldn't budge.

I spoke to a friend to make sure it was not a reverse thread on anything, but it is not, it is just tight, I needed to find an extension bar.

This is where my process of removal will vary from the pro's, as I fully embrace some backyard mechanics, tyrobenz style.

Knowing that there are several properties under renovation near my house, I decided to take the dog for a walk and see if I could spot anything resembling a steel tube in any of the skips.

As none of the skips were at the park, my dog was none to excited about this new experience, so I called it quits and went back home and had another go; nope still not budging.

I next spotted the metal pipes wired to my back yard gates. I have opened those gates neatly every day for the past 4 years and never paid any attention to them until now.  I took them off and checked that they slid over the end of my extension bar, which they did giving me an extra 200mm of a lever.

Extension bar with metal tube from back yard gates

So that I could focus my strength on undoing the nut I decided that it would be best to secure the steering wheel from spinning rather than trying to hold it, so out come same rope.

I tied the rope through the steering wheel spokes and, as Jade's interior has been stripped, I used the hole where the interior light used to be to tie the rope off.

Some backyard mechanics.  Not pretty but free and it worked

With this done I put the socket in place and hoped for the best. To my amazement the nut came loose so easily that I thought I had sheered the bolt.

Steering wheel tied tight and free from movement

Boss removed from steering column, splines undamaged, great success!

As a said, not a conventional method, but it worked, and with the boss off I was able to pack it up and post it off to its new owner, who like I referenced before, is installing a series 1 steering wheel to his series 2 vehicle.

Packed up and ready for postage to the other side of the country


Saturday, 15 November 2014

De-chromafication

With Jade's bumpers, grille and headlights removed, a phone call from a really nice chap on the other side of the country who needed some chrome for his car, motivated me to get moving with the next stage of Jade's de-chromafication.

I few of the hip line trim pieces were already damaged making these a good place to start to see how easily the parts would come off; after all I didn't want to damage parts that someone else was able to use.

To my I surprised the hip line and sill trim pieces all come off very easily.  All I used was a cloth covered large flat screwdriver, and worked my way along each piece popping the clips out of the holders.  Jade may have been an exceptions as the trim had already been removed one already when Jade changed colour, cars with original paint may not be so easy.

Starting with a damaged one.  
Here you can see the red fixings that hold all the trim pieces in place.  
It is a simple press fixing.

So much chrome, part of the /8's appeal


The quarter panel hip line trim is almost 2metres long!!!

The sill trim for some reason had had new fixings points drilled into the sill which, with little consideration for the old one that were left unfilled, potentially assisted with the spread of moisture and therefore rust within the sills.  Not a good example of "out of sight, out of mind".

WHY??!!!! Why would you add twice as many holes into the sill?

Most alarming was the amount of crud that I found under the rear window trim.  This is of corner to me as UGU already has a rust blister under her back window which I have been trying to ignore, but seeing this I realise that I need to deal with it before winter arrives in June.

It is easy to see how rusting under the back window is so common 
when this much crud gets trapped under the trim.

Thankfully the clever folk at Mercedes-Benz in the late '60's must have know the day would come when I would need to post parts across Australia, so the rear window surround breaks down into several pieces thanks to these corner backing plates.

 Rear window trim as we would see it installed on the car

Rear window trim seen from the back with helpful backing plate holding the trim together 

A few of us have had lengthy discussions on W(A)114/115 debating a topic that gets a surprising amount of back lash from the purists: Chrome wheel-arch mouldings, WAM's for short.

Love them or hate them, WAM's appeal to a lot of people and are a common sight on many classic cars and, on the right body coloured car, I quite like them too, but being from the UK, I like many other people had concerns that they would trap moisture and lead to rust.  However, in our climate in Western Australia, we have busted this myth, it is simply not the case and Jade is another example of that.  Despite the huge amount of rust seemly everywhere in her body, the fenders and in near perfect, rust free condition.

WAM's removed and there is no evidence of rust on the 
fenders despite common misconception

Windscreen bottom lip trim and windscreen wiper cowl

So, with the chrome now all off, it's time to get them packed up and off to their new owner.

What's the next task you ask? hmmm, not sure yet so keep posted.

Sunday, 17 August 2014

Check your check straps

When I think of the moving parts of a car that suffer the most amount of wear and tear, my thoughts are always directed to the drivetrain; engine, gearbox, driveshaft, differential, half-shafts, wheel bearings etc.  But when you actually think about it, none of these things work without you first having to open the door.

With this in mind, I considered how many thousands of times UGU's doors had been opened and closed in the past 43 years, and why they now showed signs of wear and would no longer hold open.

This used to annoy the life out of both my wife and I.  It was as if UGU was attacking us with her doors every time we tried to get in and out.  Even on a flat surface the doors would close hitting us on the shin or another part of the leg!  I had no idea why the doors would't stay open so I posted the question on the Facebook group W(A)114/115, and the guys there told me that my check straps were knackered.

For those that don't know what a check strap is, just like I didn't, the check strap is that flat metal bar that you see below the interior light switch in the door reveal which I have referenced in a previous post.  That metal bar connects the door to the main body structure of the car and serves two purposes: the first we have mentioned, to hold the door open, and the second function is to stop the door opening too far if caught be a strong wind for example.  Without the check strap the door would swing around and hit the front wing damaging the bodywork.

Check strap connection to main body towards bottom of image

I have not been able to determine if the /8 has different strength check straps. At this stage I do not believe that they do, even though the coupĂ© doors are significantly bigger than the sedans, which I would imagine would put more stress on the check strap.  Perhaps this is why coupĂ©'s seem to all suffer from this problem.

A simple way to check if your car's check strap is broken is to try and wiggle the check strap.  It should not move from side to side; if it does, it is broken.

So, with the problem identified, what to do next? Get replacement parts...

I got on the phone and rang a few different MB parts suppliers.  Initially I was looking for new parts, but after being quoted $300AUD each I started looking for good second hand parts despite being told that I was wasting my time as they would just fail again.  Let me tell you, this is not true, second hand parts can work just fine!  Two years later I still have had no issues with my replacement parts.

I eventually sourced one unit in Arizona, USA via Ebay.  Even though I need two, I decided one was better than none, so when it arrived the next week I decided to attend to the passenger door first.  This made sense as only I ever open the drivers door and am more likely to forgive UGU for attacking me with her door - I find it hard to hold a grudge with her.

To access the check strap you first need to strip down the interior door trim; map pockets, arm rest, window winder and door card to name a few.  Despite their age, every single piece unscrewed and unclipped with ease. This was one of the first DIY jobs I attended to with UGU, and it was my first real appreciation for the renowned Mercedes-Benz build quality.

   
Passenger door with interior trim removed

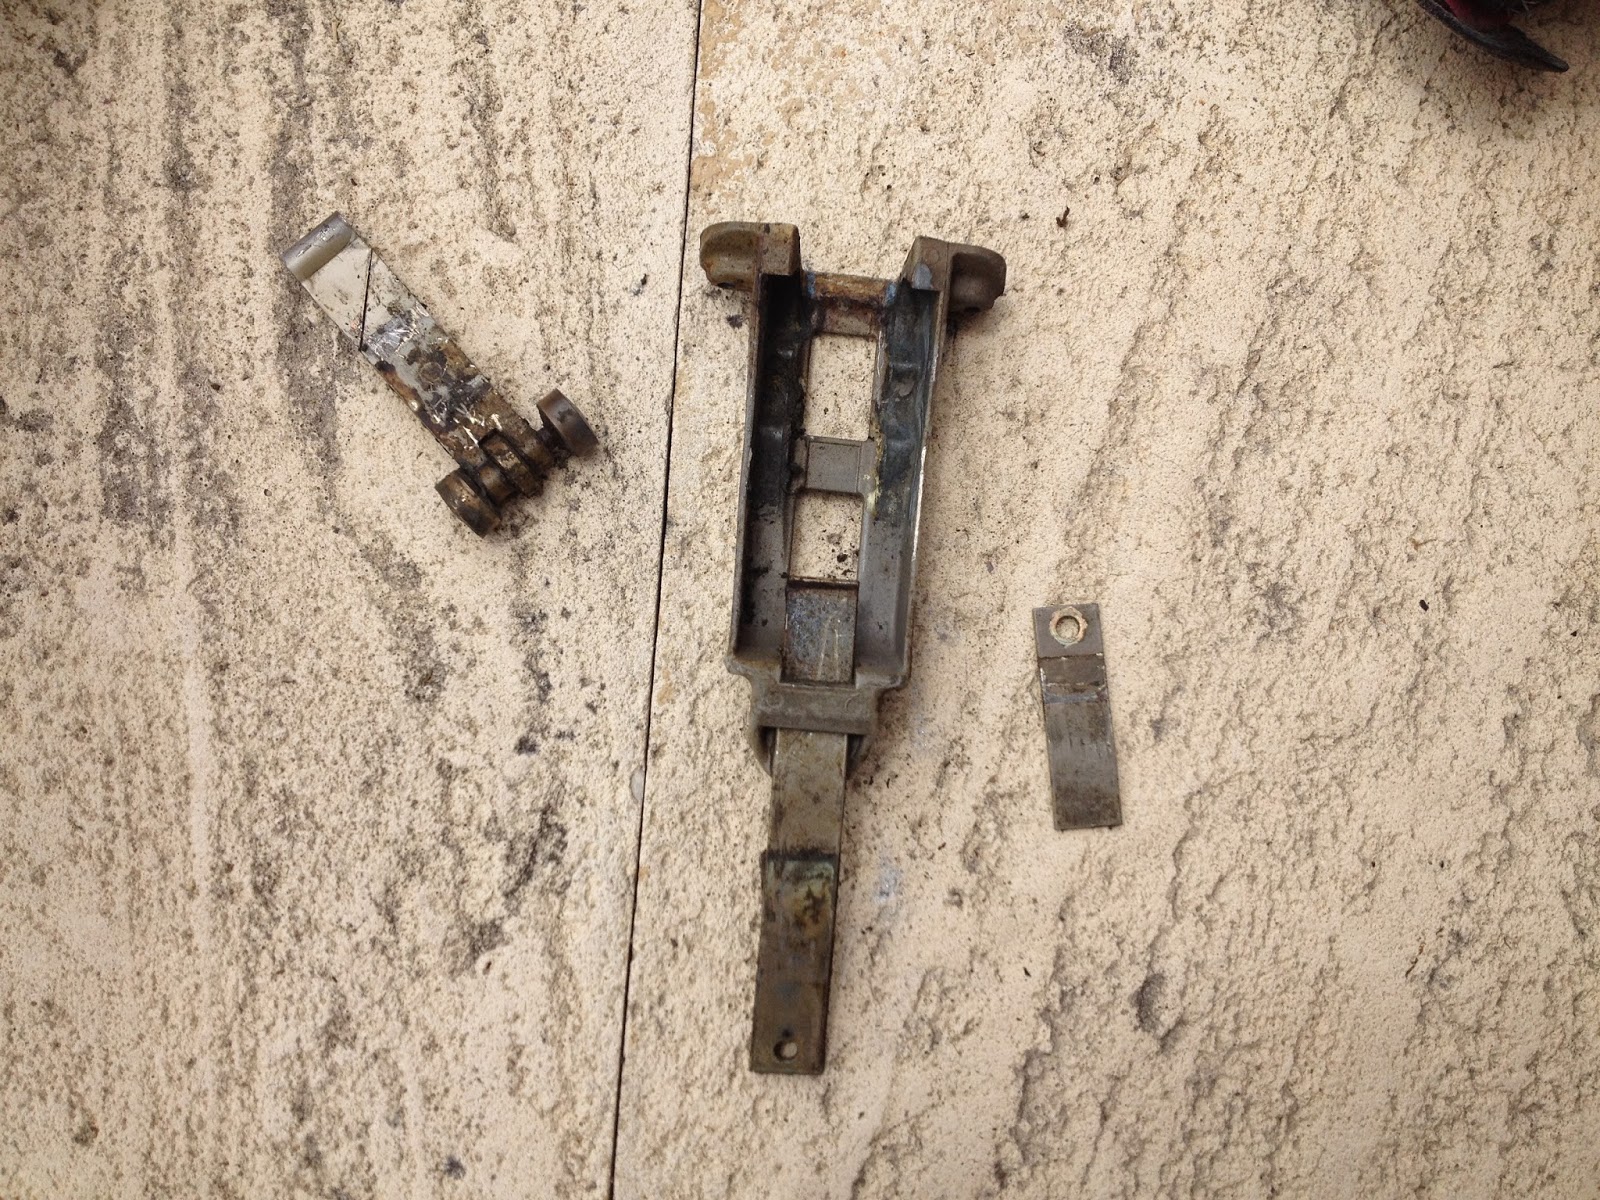
With the trim out of the way, I fished about in the bottom of the door removing the dirt and muck that had gathered over the years. It was here I found the first part of the broken check strap; it was very broken, smashed to smithereens in fact.

Remnants of original check strap

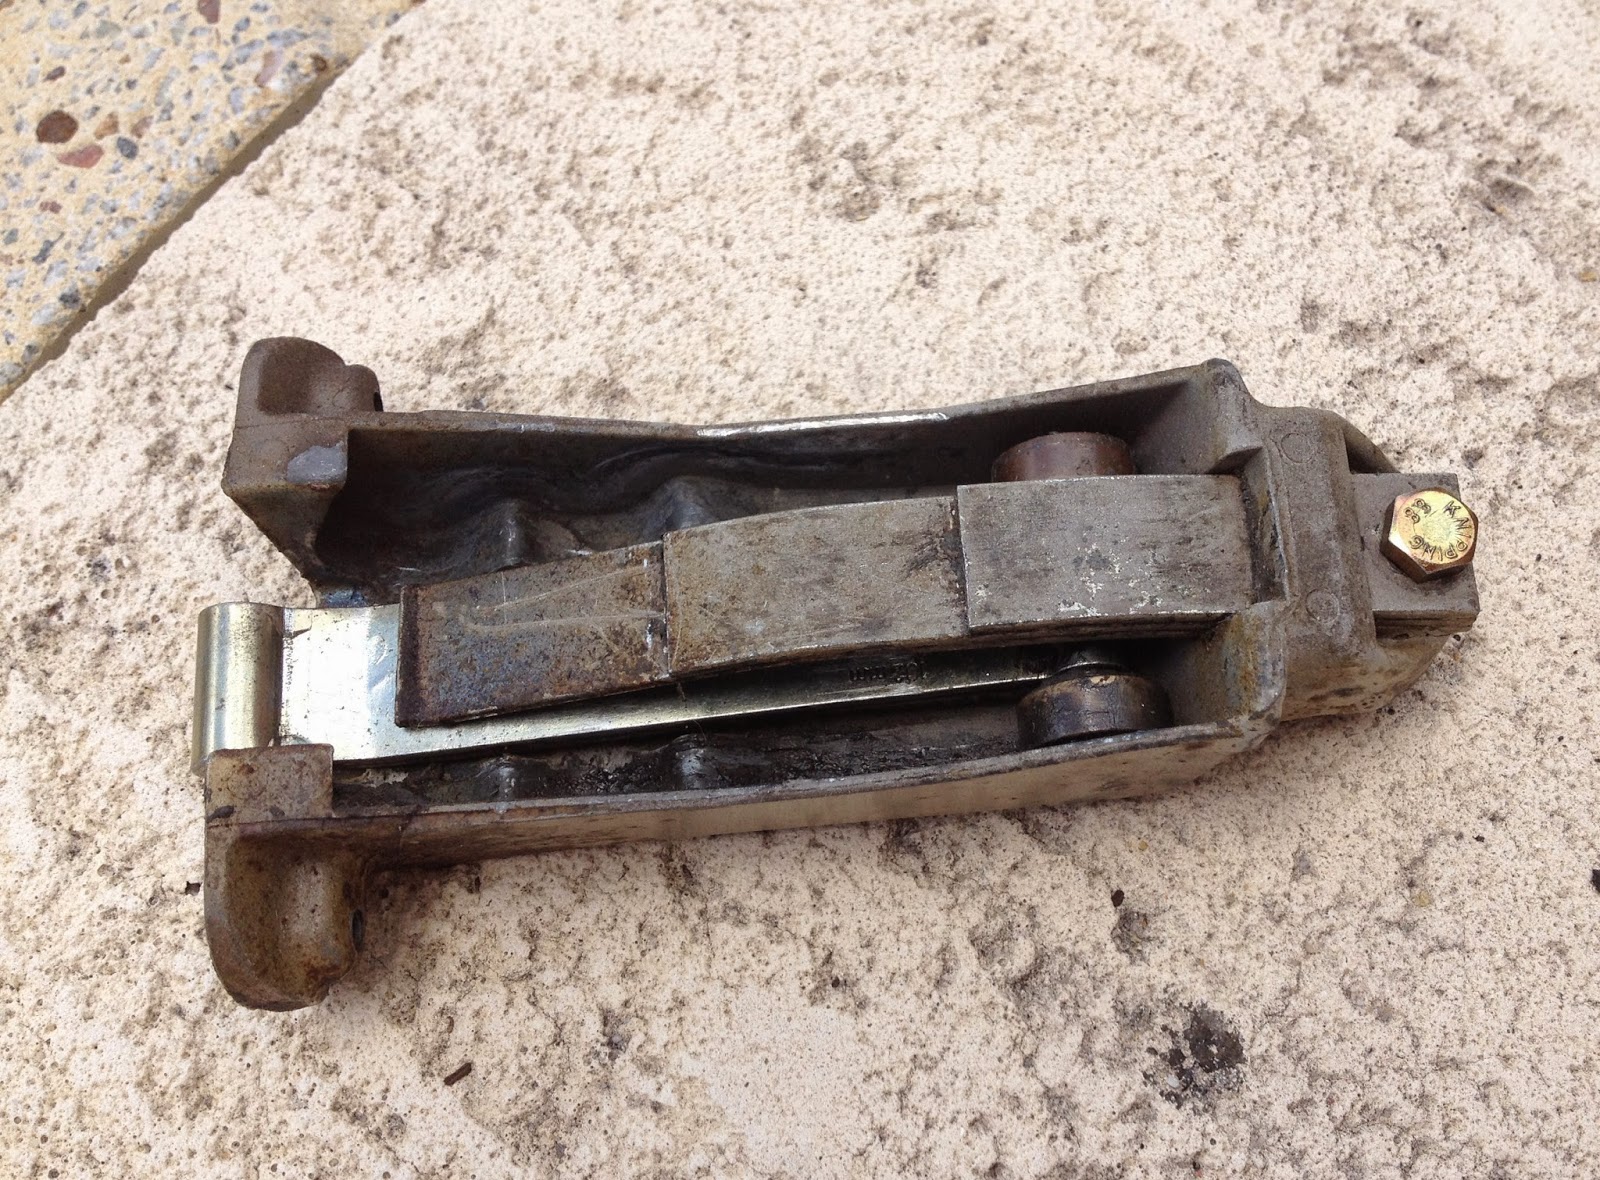
This is what it is supposed to look like

To remove the check strap from the main car body, remove the c-clip on the bottom side of the retaining pin and pull the pin upwards.  At this point it is worth using something to hold the door open as it will want to close and it will keep hitting you, either tie the door to something, or prop it open. In true tyro fashion I used a wheelie-bin to prop it open, haha.

Next, undo the two bolts on the edge of the door and the single retaining screw on the inside face of the door. That is it.  Pull out the old check strap and have a look at what you have, and I bet it will be scrap.

Before installing the replacement part I would recommend cleaning it, re-greasing it, and if you are precious, painting the check strap the correct colour as it should be body coloured.

Whilst the door is stripped down it is also worth a good clean and investigation of the rest of the door inner parts such as the window mechanism and door lock.

To install the new part I retraced my removal steps. I loosely bolted and screwed the check strap to the door and set about connecting the metal bar to the car body.  Physics was never my strongest subject, but at this point I realised how the weight and momentum of the door makes opening and extending the check strap effortless. Doing this when you only have a tiny metal bar to pull on isn't so easy!  Only when you have finally extended the check strap to a point where it can reach the main body fixing point, whilst allowing you to fit between the car sill and door will you be able to line up the retaining pin. Push the pin all the way through the main body fixing and secure it with the c-clip you removed as one of the first steps.

With this done you will be able to open the door and fully extend the check strap (if you have not done so already).  If the new part is working the door will now stay open unassisted.

You can now tighten up the bolts and screws firmly, securing the check strap casing to the door.

Open and close the door a few times and make sure there are no grinding or groaning noises.  Also make sure the door is not hitting the wing when fully opened, and that it will stay open.  If all looks good, refit the interior door trim and that's it, job done.

Approximately 6 months past before I was able to attend to my drivers door as I struggled to find another replacement.  It was only after talking to a fellow member of my local MB car club that we realised that the check strap casing is the same as on a W108 which he coincidently had as a parts car.

The W108 check strap casing turned out to be the same as the W114, however the metal arm was a different length, shorter from memory.  This is an easy problem to overcome and this is how:

Strip down interior door trim, and prop open the door (wheelie bin worked for me)

Remove what is left of the existing check strap. It made sense that the drivers side had suffered more wear than the passenger side

This is one of the wheels from the existing check strap.  As you can see this wheel has not turned properly for years. Instead it has just ground up and down the casing creating these flat spots

Using a large flat head screw driver and hammer tap the top and smallest level of the spring out of the casing.  With this removed all pieces come loose and can be moved out of the way allowing the metal arm and connecting wheels to come free.

Top level of spring removed allowing all parts to become loose

The wheels on the arms are not physically connected to the metal arm, they fit onto a pin and once in the casing everything keeps in place.

Reassembled check strap (as mentioned before the metal arm is supposed to be body coloured but I like the shiny metal look)

Note: The metal arm has a specific curvature to allow it to open with the swing of the door.  If this is not put in incorrectly it will not work and you risk breaking the check strap and undoing all your hard work so please take care, and take note of the position of the original before you take it apart.  I learnt this the hard way and had to take it all apart again, but thankfully didn't break anything.

With the newly completed check strap, fit and test as per previous instruction.

UGU basking in the 38+C degrees with her door open unassisted, hurray!


I really hope that this will help someone else, and save them the annoyance of being attacked by their car doors, haha.